Project
Project: A Wristwatch with the ESP32-2424S012 Round Board (ESP32-C3 and a 1.28" Screen)
Step-by-step analog watch on the ESP32-2424S012 round board: OLED prototype in the simulator, time from the internet and a screen that lights up on a button.
By Prof. Rodrigo Faustino · Updated on · 11 min read
Metrics for this article
- Words
- 2,018
- Characters
- 11,262
- Reading time
- ~11 min
A wristwatch built in the classroom is one of those projects that makes the whole class want to take part. The ESP32-2424S012 board makes it possible without soldering: it is round, has a 1.28" color screen of 240 × 240 pixels, an ESP32-C3 on the back, a battery connector, a charger and an on/off switch. All that is missing is the strap.
This article builds an analog watch — with hands drawn by sine and cosine — that sets the time over the internet, turns the screen off to save battery and lights it up when the button is pressed. Since the round board is not yet in the simulator, the project starts with a prototype: the same ESP32-C3 (on the Super Mini) with the bench's OLED screen, which the simulator knows well. The math, the timing logic and the drawing are the same; on the round board, only the screen changes.
Getting to know the round board

The ESP32-2424S012 uses an ESP32-C3-MINI-1U module, with the same chip as the Super Mini. That means MicroPython is the same firmware (ESP32_GENERIC_C3), and everything that holds for the C3 — the ADC only on GPIO0 to GPIO4, a single general-purpose SPI, the LED and the button — holds here too. The difference is in what comes wired inside:
- the GC9A01 screen, over SPI, on GPIO6 (clock), 7 (data), 10 (select) and 2 (data/command);
- the screen's backlight, on GPIO3, through a transistor — it is what uses the most battery;
- on the versions with touch, the CST816D controller, over I2C, on GPIO4 and 5;
- the BOOT button, on GPIO9, which the program can read as an ordinary button after the board has started;
- the battery charger and the on/off switch.
These pins come from the board's configuration in the HomeDing project, the most complete source we found. Since the listings do not always make clear which version is on sale, the first step with the board in your hands is to check: the screen test program (further on) tells you whether the screen pins are right, and I2C(0, scl=Pin(5), sda=Pin(4)).scan() shows the address 0x15 if the board has touch.
Another important difference: the board has no pin header. You cannot connect external sensors as on the Super Mini. It is a ready-made watch, and what you program is the screen, the button, the touch and the radio.
From the syllabus to a planned semester
- Teaching plan and calendar built automatically
- Class diary ready to paste into SIGA
- Slides and exercise lists with answer keys
Free Community edition · Windows
What you will need
For the prototype in the simulator and on the bench:
For the real watch:
- the ESP32-2424S012 board;
- a small lithium battery, with the board's connector (check the connector in the listing and on the board itself before buying the battery);
- an ordinary watch strap and a small 3D-printed case, or one made of EVA foam, to hold the board;
- the Python driver for the GC9A01 screen — we use gc9a01py, by Russ Hughes, under the MIT license.
Step 1: from the time to the hand
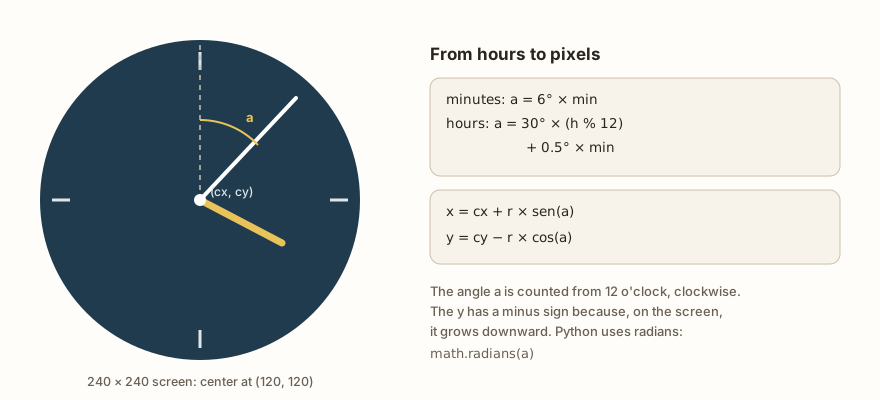
A hand is a line that leaves the center of the dial. The center is easy: on a 240 × 240 screen, it is the point (120, 120). The tip is the hard part, and that is where trigonometry comes in:
- the minute hand moves 6° per minute (360° ÷ 60);
- the hour hand moves 30° per hour (360° ÷ 12) plus 0.5° per minute, so it does not jump from one hour to the next;
- with the angle
ameasured from 12 o'clock, clockwise, the tip ends up atx = cx + r·sen(a)andy = cy − r·cos(a). The minus sign appears because, on screens, y grows downward.
The example calculates the tips for 10:10:30 — the favorite time in watch photos — and prints the coordinates. It runs with no circuit.
import math

CX, CY = 120, 120      # center of the 240 x 240 round screen

def ponta(angulo_graus, raio):
    a = math.radians(angulo_graus)
    return round(CX + raio * math.sin(a)), round(CY - raio * math.cos(a))

def ponteiros(h, m, s):
    return {
        'hours':    ponta(30 * (h % 12) + 0.5 * m, 55),
        'minutes':  ponta(6 * m + 0.1 * s, 85),
        'seconds': ponta(6 * s, 95),
    }

for nome, (x, y) in ponteiros(10, 10, 30).items():
print('%-8s -> (%3d, %3d)' % (nome, x, y))Check the result against the drawing: at 10:10, the hour hand points up and to the left (x less than 120, y less than 120), and the minute hand up and to the right. The second hand, at 30 s, points straight down: x equal to 120 and y much larger. The minute hand also moves a little with the seconds (0.1° per second), for the same reason as the hour hand.
Step 2: the prototype with the OLED screen
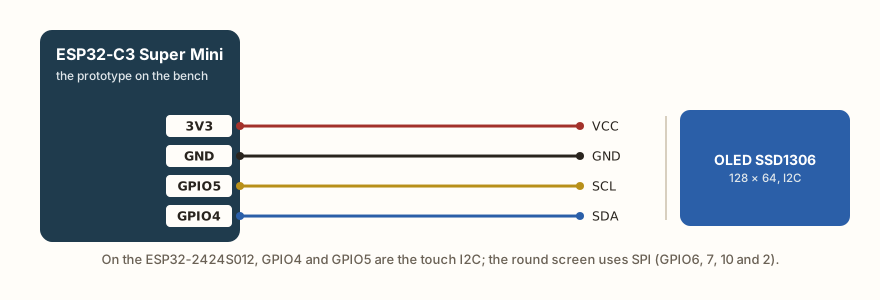
On the bench, the Super Mini connects the OLED screen over I2C with SDA on GPIO4 and SCL on GPIO5 — the same pins as the touch I2C on the round board, so the habit is already right. The screen is 128 × 64 pixels, so the dial fits in a circle of radius 30 on the left side, and there is room for the time in numbers on the right.
The simulator does not yet have machine.RTC to set the board's clock. The program does what a watch without internet would do: it starts from an initial time written in the code and adds the time that has passed since it was turned on. The example draws the dial for 3 seconds and stops; open it with the circuit and watch the hands on the screen.
from machine import Pin, I2C
from ssd1306 import SSD1306_I2C
import math, time

i2c = I2C(0, scl=Pin(5), sda=Pin(4))
oled = SSD1306_I2C(128, 64, i2c)

CX, CY, R = 32, 32, 30
HORA_INICIAL = 10 * 3600 + 10 * 60 + 30     # 10:10:30, set by hand
ligou = time.time()

def ponta(graus, raio):
    a = math.radians(graus)
    return int(CX + raio * math.sin(a)), int(CY - raio * math.cos(a))

def desenhar(h, m, s):
    oled.fill(0)
    oled.ellipse(CX, CY, R, R, 1)
    for marca in range(12):                     # the 12 hour ticks
        x1, y1 = ponta(30 * marca, R - 4)
        x2, y2 = ponta(30 * marca, R - 1)
        oled.line(x1, y1, x2, y2, 1)
    for graus, raio in ((30 * (h % 12) + 0.5 * m, 15), (6 * m + 0.1 * s, 24), (6 * s, 27)):
        x, y = ponta(graus, raio)
        oled.line(CX, CY, x, y, 1)
    oled.text('%02d:%02d' % (h, m), 72, 20)
    oled.text(':%02d' % s, 80, 34)
    oled.show()

for _ in range(3):
    total = (HORA_INICIAL + time.time() - ligou) % 86400
    h, m, s = total // 3600, total % 3600 // 60, total % 60
    desenhar(h, m, s)
    print('%02d:%02d:%02d' % (h, m, s))
time.sleep(1)The % 86400 makes the clock "roll over" at midnight: 86400 is the number of seconds in a day. Note also that the program erases and redraws the whole screen every second. On the OLED, that is instantaneous, because the drawing happens in memory and only show() sends the finished image. On the round board's color screen it will be different, as step 4 explains.
The AI that remembers your life and lives on your computer
- Long-term memory with the source of every answer
- Works offline: your data stays on your PC
- Reads PDFs, slides, photos and meeting recordings
Essential plan free forever
Step 3: the right time from the internet
A watch that starts from a time written in the code runs slow or fast, and "forgets" everything when the battery runs out. The way to have the right time is to ask a time server over the internet, with the NTP protocol. The ESP32's MicroPython comes with the ntptime module: with Wi-Fi connected, ntptime.settime() sets the board's internal clock.
But NTP delivers UTC time, the world reference time. Brasília time is UTC−3, and Brazil has not used daylight saving time since 2019 — so you just subtract 3 hours. Other regions of the country have other time zones: check yours. The example does the math with an arbitrary instant, in the small hours in UTC, to show that the day can change too.
import time

FUSO_HORAS = -3           # Brasília; adjust for your time zone

def hora_local(segundos_utc):
    return time.localtime(segundos_utc + FUSO_HORAS * 3600)

utc = time.mktime((2026, 11, 10, 2, 5, 0, 0, 0))    # 10/11, 02:05 in UTC
a, mes, d, h, m, s, _, _ = hora_local(utc)
print('UTC:   10/11/2026 02:05')
print('local: %02d/%02d/%d %02d:%02d' % (d, mes, a, h, m))At 2:05 on 10/11 in UTC, it is still 23:05 on 9/11 in Brasília. A common mistake in homemade watches is showing the right time with the wrong date precisely in that interval.
On the board, setting the time goes like this — once at startup and then once a day is enough, because the internal clock holds the time well between one setting and the next:
import network, ntptime, time

wlan = network.WLAN(network.STA_IF)
wlan.active(True)
wlan.connect('network-name', 'network-password')
for _ in range(20):                 # up to about 10 s
    if wlan.isconnected():
        break
    time.sleep_ms(500)
if wlan.isconnected():
    try:
        ntptime.settime()           # the board's clock in UTC
    except OSError:
        pass                        # no answer: it keeps the time it already had
wlan.active(False) # radio off: saves batteryStep 4: on the round board
With the board in hand, the program swaps the OLED for the GC9A01. The gc9a01py driver has methods similar to the OLED's: fill, pixel, line, rect, fill_rect, text (with a font module from the driver's own repository), and the color565 function to make colors. The constructor receives the SPI and the screen's pins.
from machine import Pin, SPI
import gc9a01py as gc9a01

spi = SPI(1, sck=Pin(6), mosi=Pin(7))       # on the C3, only SPI(1) exists
tela = gc9a01.GC9A01(
    spi,
    dc=Pin(2, Pin.OUT),
    cs=Pin(10, Pin.OUT),
    backlight=Pin(3, Pin.OUT),
    rotation=0,
)
# TODO(fidelidade): the pin source does not give a screen reset pin; without it, the driver goes on with no reset.

PRETO = gc9a01.color565(0, 0, 0)
BRANCO = gc9a01.color565(255, 255, 255)
AMARELO = gc9a01.color565(232, 195, 90)

tela.fill(PRETO)
tela.line(120, 120, 175, 64, AMARELO)       # a test hand
tela.line(120, 120, 120, 30, BRANCO)If both lines appear, the screen pins are right. If the screen stays black, check whether the backlight came on (GPIO3) and try lowering the SPI speed — the baudrate argument of SPI(); the driver's examples show starting values.
On the color screen, erasing and redrawing everything every second is slow: that is 240 × 240 pixels, 2 bytes each, going through the SPI. The classic technique is to erase only the old hands: draw each old hand again, in the background color, and then the new one in the right color. The dial and the ticks are drawn all at once, at the start.
anteriores = {}

def ponteiro(nome, graus, raio, cor):
    x, y = ponta(graus, raio)                # the same function from step 1
    velho = anteriores.get(nome)
    if velho and velho != (x, y):
        tela.line(120, 120, velho[0], velho[1], PRETO)   # erases the old one
    tela.line(120, 120, x, y, cor)
anteriores[nome] = (x, y)Step 5: saving battery
The article batteries on the ESP32 devotes a whole section to watches, and the main rule is this: the screen's backlight is the biggest bill. A wristwatch does not need to stay lit: the person looks for a few seconds and lowers their arm.
The program's plan goes like this:
- when BOOT is pressed (GPIO9, which reads 0 when pressed), it turns on the backlight and draws the time;
- after 5 seconds without another press, it turns the backlight off;
- with the screen off, the board can sleep in light sleep and wake every few seconds to check the button — or, better, be woken by the button itself;
- Wi-Fi turns on only once a day, to set the time, and turns off right after.
Since the backlight is on a pin, you can even control its brightness with PWM, as in the article PWM on the ESP32, and use the minimum that is still readable. With the watch ready, measure the consumption with the screen on and off — it is the only way to know how long your battery will last.
Step 6: from prototype to wrist
The physical part of the watch is where the project gets the look of a product, and it is worth planning with the same care as the program:
- the battery first: connect the battery to the board's connector with the switch off, check the polarity (the red wire is positive; small connectors do not always follow the same order between manufacturers) and only then turn on the switch. A battery connected backwards can ruin the board's charger;
- the case: the round board needs a frame that holds the edge of the screen without squeezing the glass, with room behind for the battery and an opening for the USB-C and another to reach the button. A 3D-printed case is the prettiest way; one made of layered EVA foam, glued and cut out, also works and is great for the first version;
- the strap: an ordinary watch strap, held by two loops on the case, or a Velcro strip, which allows adjusting to any wrist;
- the battery secured: it cannot sit loose inside the case, nor be squeezed or bent. A piece of double-sided tape and a layer of foam solve it;
- a one-day test: charge it, use the watch for a normal day and note how long it lasted. Compare with the calculation in the batteries article and find out what used more than predicted.
Before closing the case, remember to leave access to the USB-C: that is how the battery charges and how a new program is flashed. A watch that has to be taken apart to update discourages anyone after the third time.
Ideas to go further
- Different dials: digital, with big numbers; a ring that fills up over the minute; colors that change with the time of day. Each one is a drawing exercise with coordinates.
- Touch: on the versions with the CST816D, the touch can switch dials. The first step is the I2C
scan()showing the address 0x15; to read touches, use a CST816 driver for MicroPython. - Stopwatch and timer: the Timer lesson shows how to count time without freezing the program.
- Messages on the wrist: the next article in the series, wrist messenger, turns two of these watches into a pair of communicators over ESP-NOW.
What this project teaches
The watch is a math lesson in disguise: angles, sine and cosine, the remainder of a division to roll over the day and time zones with additions and subtractions. It is also an engineering lesson: prototype before product, check the pins before trusting the listing, draw only what changed because the screen is slow, and save energy because the battery is small. And, in the end, it is an object the person wears on their own wrist — hard to think of better motivation.
Where to go next
The Displays track teaches the OLED screen (I2C scan and OLED); the Time without freezing track brings ticks and the Timer; and the Wi-Fi and HTTP track shows how to connect. The article I2C, OLED and LCD on the ESP32 goes deeper into the prototype's screen.
Sources
- ESP32-2424S012 pins: board configuration in the HomeDing project; charger and button confirmed in CircuitDigest's teardown. To be checked on a real board.
- gc9a01py driver reference and repository (MIT license).
- ESP32-C3 SPI in MicroPython v1.29.0:
ports/esp32/machine_hw_spi.c(onlySPI(1), which is the chip's SPI2). - MicroPython documentation:
ntptimeand the ESP32 quick reference.
To practice in PyPlaca
Tracks
Lessons
- I2C: two wires, several modules
- OLED: draw in memory, then show
- Is it time yet? ticks_ms and ticks_diff
- machine.Timer: the clock that calls you
- Wi-Fi: the board joins the network